
Nakashima Dining Table pt 1 – Preparing the Cleats
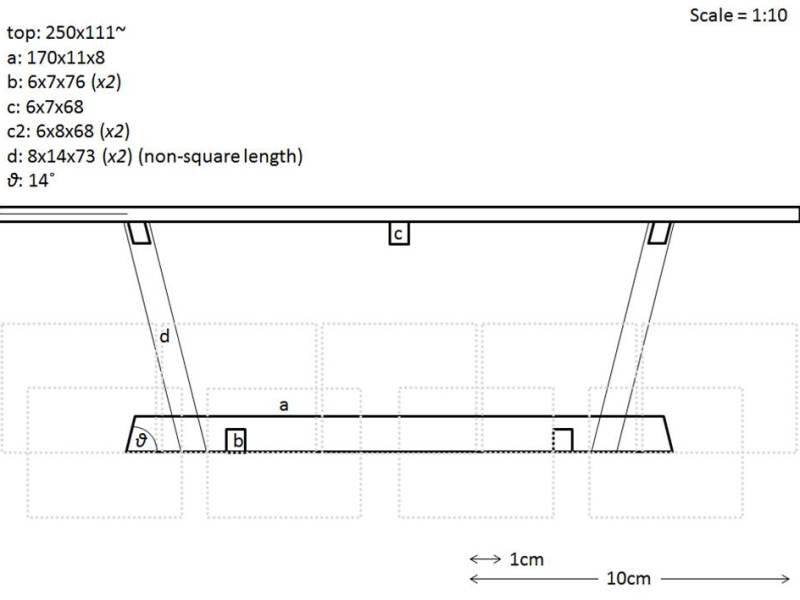
Last week I had some time to start working on the table. While Robert from Dikhout was preparing the stock for the posts and the stretcher, I went to work preparing the stock for the three cleats. First, I suppose, it would be good to get the terminology clear so we all know what we’re talking about. In the sketch on the right, the piece marked ‘a’ is the stretcher, the two pieces marked ‘b’ are the feet, the three pieces marked ‘c’ are the cleats, and finally the two pieces marked ‘d’ are the posts.
 The final thickness of the posts and the stretcher (~80mm in both cases) is more than the thickness of the boards I bought, so they have to be laminated (glued up) from two pieces each. Robert is handling these in his shop. You can see some preliminary sketches on the board, indicating where these pieces will cut from, in the picture on the left. You can just about make out two pieces marked ‘a’, which will be squared, planed smooth, and glued up to create the stretcher, and four pieces marked ‘d’, which will make the two posts. More on those pieces next time. Let’s get back to the cleats for now.
The three boards of French walnut I showed you last time were just shy of being enough for the whole table. There will be a few offcuts here and there (for which I have interesting plans; more on that on another occasion), but there was no way I could come up with a way to find all the pieces I needed in those boards. Luckily, I happened to have just the right piece of walnut in my small stash of lumber at home. I purchased this a few months ago from Robert with other things in mind, but it will be perfect for the cleats and I am very happy I never got round to using it for something else.
The board was already cut in two pieces when I started working on it. First, the longer piece was cut across the grain into two pieces, then the shorter piece was cut to length to make the third cleat. This process is shown in the following sequence of six photographs, the last two showing the three rough pieces, cut to length. The middle cleat will be slightly shorter in length, mainly by necessity, but in hindsight a good decision anyway. The next step in the process is to rip (cut along the grain) the three cleats to final width and to square them up and smooth them, using handplanes.


Using the shorter of the three cleats to illustrate, first one of the edges is planed straight and smooth (first two photos below), then a line is scribed or drawn that is parallel to that edge and at the right distance, on the two faces. Then, it’s a simple matter of cutting to (or close to) the line with a handsaw (third and fourth photos), straightening and smoothing that edge with a handplane, and finally squaring and smoothing the two faces (photos five and six).


Repeat twice more for the other two cleats and you have a neat stack of three square and smooth pieces so you can start laying out the joinery and final dimensions. Speaking of stacks, check out the final photo below. It includes the parts that Robert prepared for me and I mentioned in the first paragraph of this post. These are pretty much all the pieces (except for the two feet) I need to put together the frame of the table. Time for some rest, now, however. Laying out joinery (not to say anything about cutting joinery) requires a clear mind. Thank you for visiting me here. See you all next time.
.tassos


Hi Tassos, great prjoect. Do you have any further updates on your progress. I plan do build a Conoid dining table as well.
Thanks
Alex
Hi Alex,
Yes, I’ve made more progress that I haven’t posted about yet. I copied the pictures from my camera this morning and I’ll post an update in the next two days. Thanks for your interest in this series. What are you making your table out of? It took me a while to find the right kind of slabs and I’m just getting to grips with working them with handtools. I had a brief (actually, more than brief!) sidetrack with some home-improvement tasks, but I am now back to working on the tabletop.
cheers,
Tassos
Tassos,
thanks for responding so fast!
I use American Black walnut (I had that tree (100cm diam) actually cut and made into slabs 3 years ago. It yielded about 2.5 tons of perfect lumber that is drying in my backyard)
I’ve done a couch table and a nice bench from it already but held off with the dining table since my kids are still small enough to smack it to death with their toys and cutlery.
Last year I started to glue up the big stretcher and the 2 uprights but that’s about it. I will use a local sawmill to have the 2 bookmarked slabs sanded and probably joined together since I have little room and no good way to move and clamp these 100kg behemoths.
I’ll pull out my own plans but I think in term of angles and dimensions we are pretty close. I took a bunch of pictures to derive the dimensions from.
Best regards from Michigan,
Alex
I will also be building the Conoid table in the near future. So I will be following along with your progress.